Creating a successful online business is no joke. It’s hard work, time consuming and sometimes just downright confusing trying to figure out next steps. But remarkable brands aren’t built overnight; they’re the product and accumulation of countless hours of constructing, fine-tuning, listening, learning and adapting.
Daily, we’re asked by our clients to help them make their sites perform better. They already have great sites and great products but they’ve hit a wall in how to improve their sites performance. They know that page speed and optimization effects page rank, site traffic and ultimately sales. This is why, 9 times out of 10, we recommend Cloudflare to our clients who are wanting to supercharge their sites.
So what is CloudFlare? CloudFlare is a DNS manager that helps sites become faster and safer. And with over 5,000,000 sites using their service, they’ve more than proven themselves as a reliable and effective service. Best yet, their free plan offers the most important features that address performance and security.
In this how to guide we’re going to go through the process of setting up a site on Cloudflare to see what performance improvements, if any, can be gleaned from Cloudflares services.
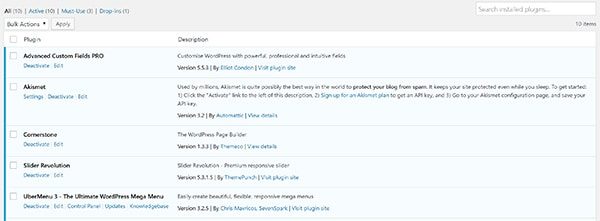
For the purposes of this tutorial we wan’t to mimic a real production website so we’re going to use X theme, from the fine folks at Themeco, along with the demo content and add an additional 10 plugins.

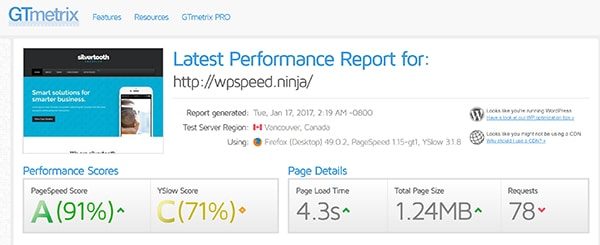
Now that we’ve loaded in our theme and plugins we’ll want to get a baseline for how our site is performing. For this we’re going to use GTmetrix.
GTmetrix is a great multi-purpose tool that accounts for PageSpeed and YSlow Scores as well as Page Load Time and site Requests. We’ll want to see if Cloudflare is able to help our site perform better in all of these areas.

The results of our first test are actually quite reasonable. But there’s always room for improvement! The best way to spot areas of improvement are to look through the PageSpeed and YSlow recommendations. These are going to be the most obvious ways in which we can impove our sites.

For this tutorial though we want to see the impact Cloudflare alone can have on page performance. We’ll do that by siging up for a free account at cloudflare.com.
Once you’ve signed up for an account, you’ll begin by adding your site and clicking the “Begin Scan” button. This will pull in all your DNS records from your domain register.
Once your domain records have been pulled into Cloudflare, you’ll want to compare the records with those from your Domain Register to ensure everything was pulled over correctly. If anything is missing you’ll need to add that to CloudFlare manually.
Next we’ll be asked to “Select a Cloudflare Plan.” For our purposes, the free plan is all we’ll need but if you have a high-end site with lots of traffic and need higher level of security and support, one of the paid plans may be a good solution for you.
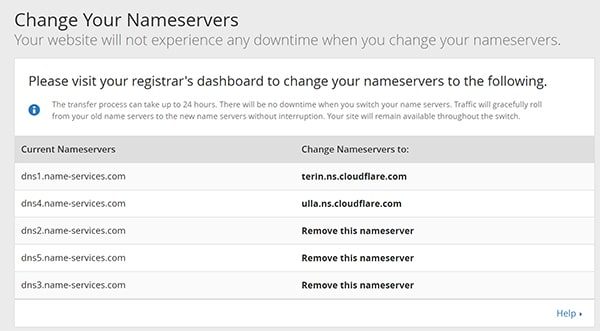
Next we’ll need to change our Nameservers to point to CloudFlare. This is going to make it so that all our site traffic get’s sent to CloudFlare and then routed to our site. Pay attention to this step because, as you’ll see in the image below, CloudFlare is asking me to use my nameserver 1 and 4 and wanting me to remove the values for the rest.

To ensure that Cloudflare is optimized for our WordPress environment, we’re going to install the Cloudflare plugin for WordPress. Once we’ve installed and activated the plugin, we’ll need to get it setup by going to Settings > Cloudflare and adding our Cloudflare login and API details. You’ll find your Cloudflare API key in your CloudFlare account by going to you Username in the top right hand corner and then my settings.
If you scroll down you’ll see the API Key section. For the plugin we’ll use the Global API key.

After we’ve entered the Cloudflare credentials, within the WordPress Dashboard, we can go ahead and Apply the default Cloudflare settings by clicking on the apply button. This will allow Cloudflare to setup the recommended settings to ensure optimal site performance.
Now back in Cloudflare, if we navigate to the page rules we’ll notice a new page rule has been added. We can add further page rules to increase performance and security but for this tutorial we wont be adding any others.
You’ll also notice that all the recommended settings within the Firewall, Speed and Caching tabs have also been setup.
There is one more setting that we’ll want to setup within the Speed tab and that’s to turn on the Rocket Loader. This feature helps to improve load time for pages that include JavaScript.
For most sites these changes are sufficient enough but you can always modify things further for your specific needs.
With internet security becoming more an more of an issue, SSL certificates are becoming more important for website owners regardless of the type of website. An additional benefit of enforcing a secure connection is that your domain will be able to utilize HTTP/2, which can greatly improve site speed.
We’re not going to cover setting up an SSL in this tutorial but keep in mind that it is an important security measure for online businesses.
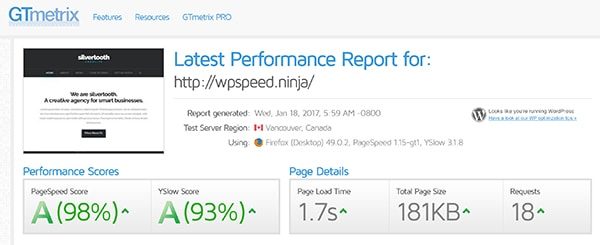
So now that we’re all setup with Cloudflare, let’s go back to GTmetrix to test how much of an impact it’s had on our site performance.

As you can see we were able to go from a PageSpeed Score of 91 to 98 and YSlow Score from 71 to 93. You’ll also notice that our page speed went from 4.3 seconds to 1.7 and our site requests went from 78 to 18!
Ya, you read that right. Don’t believe me? Go test it yourself. Our site is still live and you can find it at wpspeed.ninja. Results like these are why we’re so excited about Cloudflare. There is always more that can be done but as far as getting the most bang for your buck, with the lest amount of effort, Cloudflare is definitely the way to go.
To further validate our success, we did a Pingdom Website Speed Test and found our site loads in 572 ms from a US server, which, according to Pindom is faster then 96% of tested sites… Not bad!

As you’ve seen from our tests, the impact that Cloudflare can have on your site is significant no matter if you’re just getting started or have a well established site. If you’ve been following along with your own site we hope that you’ve gained some big improvements with your site performance. We love to hear success stories and if moving over to Cloudflare has made a impact on your site performance we’d love to hear about it.

